Anúncios
Clutter makes it easy to lose track of food and waste both time and money. A clear system turns that messy shelf into a useful space where items are simple to find.
After six months of testing, I kept the setup as neat as day one. Two young adult women who visited last month said the transformation felt both practical and stylish.
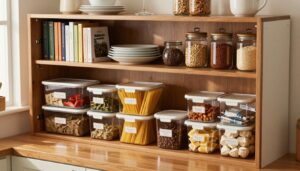
Use clear containers and labeled bins to keep products visible. Add a door rack or extra shelving to free floor space and stop bags and plastic from piling up.
Anúncios
Small changes save big time during busy weeknights. When the family follows one easy system, snacks and cooking goods stay in place and expired items stop hiding at the back.
Assessing Your Current Pantry Space
Pull everything out of your shelves to get a true sense of how much room you have. My setup is a two-door closet with six wire shelves, so clearing each level made the limits obvious fast.
Decluttering is the first step to better use of that small pantry. Sort what you want to keep, donate, or toss. Be honest about what your family eats and what just takes up shelf space.
Anúncios
Decluttering Your Inventory
When the closet is empty, you can spot duplicates and forgotten boxes on the floor. I found three pasta boxes hidden behind baking supplies.
- Pull out all items to assess real capacity.
- Wipe down shelves and vacuum the floor for a clean slate.
- Donate nonperishables you won’t use to free up pantry space.
Checking Expiration Dates
Inspect canned goods and baking supplies closely. Toss anything past its date and set aside soon-to-expire jars for the week’s meals.
Once expired food is removed, grouping similar things becomes easier. This tidy start reduces wasted time and prevents overbuying in a small kitchen.
The Importance of Planning Before You Buy
Measure twice before you buy: a few inches make a big difference when fitting containers on a shelf. Take time to study the space and note shelf heights, depths, and any odd gaps.
I spent a lot of time staring at my messy shelves to see how our home used the area. That pause helped me sketch a plan with real measurements.
Don’t rush to the store. Mapping your storage needs prevents wasted money on containers that don’t fit or hold the items you own.
- Make a simple sketch with shelf dimensions.
- Account for tall bottles, bulky cereal boxes, and small jars.
- Plan zones for daily use vs. overflow so every inch works.
A little planning saves a lot of time and creates a layout that is both beautiful and functional for daily cooking and baking.
Effective Pantry Organization Ideas for Every Home
Simple habits and clear zones keep staples visible so nothing gets lost on a shelf.
Start by grouping similar products together—cereals with cereals, baking with baking, snacks with snacks. This creates a grocery-store style flow that makes finding items faster and shopping lists simpler.
Use clear bins and labels for small items. Labels teach everyone in the home where things go and cut guessing when cooking.
- Keep daily-use items at eye level for quick grab-and-go access.
- Store overflow or seasonal goods on higher shelves.
- For a small pantry, limit duplicate products and rotate older items forward.
Choose storage ideas that match how your family cooks. The best system is one you can follow each day.
These practical tips help you spend less time searching and more time cooking in a kitchen that runs smoothly.
Decanting Dry Goods into Clear Containers
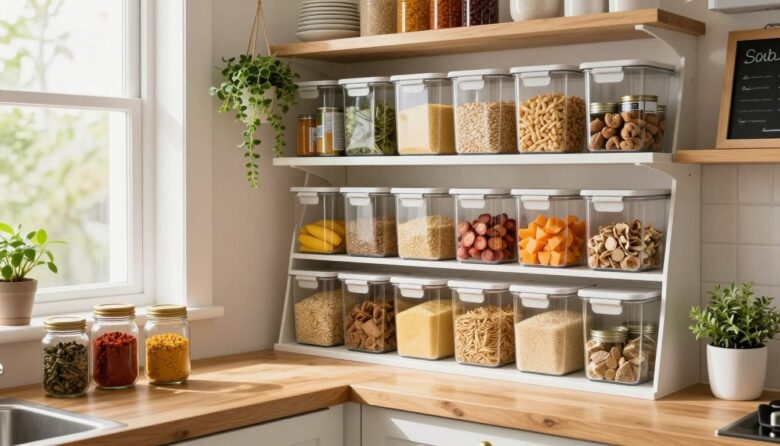
Decanting dry staples into clear jars instantly shows what you have at a glance. That simple swap saves space and cuts the time you spend hunting for snacks or baking goods.
Start by laying items out on your counter to check fit and volume before you pour. I use three container types: pop-top jars, sturdy plastic bins, and water hyacinth baskets for bulky goods.
Benefits of Airtight Storage
Airtight containers keep dry food fresh longer and shrink wasted room compared with cardboard boxes. Pop-top lids open in one second, so pretzel crisps and other snacks stay handy.
- Clear containers reveal quantities at eye level and make shelves look uniform.
- Clear bins group small things; baskets hold larger packages that don’t need decanting.
- Only decant your most-used items for the best return on investment.
Invest in quality containers and you’ll keep a tidy shelf that works for daily life.
Utilizing Vertical Space with Shelving
Look up: the area above eye level often hides useful storage you’ve overlooked. Adding extra shelving makes that vertical real estate work for you.
If you have empty wall space, install a shallow shelf or two to hold rarely used jars and seasonal items. Use the top shelf for overflow and keep daily essentials at eye level so grab-and-go is easy.
I chose to keep the existing six wire shelves and invest in good containers instead. That decision saved money and kept the room functional while increasing usable space.
- Use under-shelf baskets to add storage without drilling new holes.
- Add shelf liners on wire shelving to stop small items from slipping through.
- Always anchor any shelving securely to the wall for heavy cans and jars.
Thinking vertically transforms a small pantry into a space that feels larger and holds more than you expect.
The Power of Lazy Susans for Deep Shelves
A rotating tray can instantly rescue deep shelves from becoming a black hole of forgotten jars.
Lazy susans make it easy to spin and reach bottles sitting at the back. For oils, vinegars, and sauces, a turn brings every bottle into view. This simple storage tool keeps items from getting lost in dark corners.
In a small pantry, one Lazy Susan can save you from shifting stacks just to grab a single jar. Group similar products together on the turntable to create a mini station for cooking.
- Place frequently used items on the top turntable for quick access.
- Choose a size that fits shelf depth so the back area is usable.
- Use two-tier models for bottles and smaller jars to maximize space.
Many homeowners find adding a Lazy Susan one of the simplest, most impactful storage upgrades. Once you try it, you’ll wonder how you ever reached the back without it.
Maximizing the Back of the Pantry Door
Turn a wasted surface into smart storage by outfitting the door with shelves and pockets. The back of the pantry door is prime real estate and can free shelf space for larger goods.
Over the Door Shelving Systems
Over-the-door shelving mounts quickly and keeps frequently used items within reach. Choose lightweight metal or plastic racks that fit your door depth.
These systems hold spice racks, small bins, and bottles so you can save room on main shelves for bulk cans and boxes.
Hanging Shoe Organizers and Baskets
A hanging shoe organizer is perfect for snack bags, packets, and loose items. Many are made from fabric and can be trimmed to suit a slim door.
- Use baskets to corral odd-shaped goods that clutter shelves.
- Check door hinges so the added weight is safe.
- Place lightweight bags and chips high for easy grab-and-go access.
Implementing a Categorization System
Start with broad groups so each family member knows where to put an item without thinking. Choose a simple map for shelves that mirrors how you shop and cook.
Group canned goods, baking supplies, snacks, and daily staples into clear zones. Keep high-use items at eye level and bulk or overflow higher up.
- Label each zone so everyone in the family can return items to the right place.
- Use grocery-store flow: similar products near each other for faster meal prep.
- Limit categories so every item has a home without creating needless complexity.
- Reassess the layout every few months to match how your household actually uses the shelves.
A consistent system prevents items from getting shoved to the back, which cuts food waste and saves time on shopping. This straightforward way makes putting away groceries fast and keeps the pantry useful long-term.
Keeping Floors Clear of Clutter
A tidy floor instantly improves safety and makes the whole storage area feel intentional.
Make it a rule: never let loose items sit on the floor. Use sturdy bins to corral water bottles, bulk cans, or extra bags so nothing rolls out when you open the door.
If you collect wine, store it in a proper rack instead of piling bottles on the floor. Heavy goods are easier to grab when they live in a bin rather than scattered across the bottom shelf.
- Keep heavy or awkward items in low, strong bins for safer lifting.
- Add baskets for extra bags or overflow that won’t fit on your shelves.
- If clutter returns, add more shelving or stackable bins instead of letting the floor become a dumping ground.
Clearing the floor makes cleaning simple and keeps your kitchen safer. Plus, an open bottom quickly makes a small space look larger and more inviting.
Choosing the Right Bins and Baskets
A well-picked set of bins and baskets makes a big difference. The right pieces keep goods visible, protect fragile items, and speed up meal prep.
Start by measuring each shelf so your containers fit without wasted space. Use plastic bins on middle shelves for easy cleaning and quick access. Reserve woven or water hyacinth baskets for the bottom where they add warmth and hide imperfect packaging.
Selecting Durable Materials
Durability matters, especially for a family with kids. Choose sturdy plastic or tightly woven fibers that resist wear and stand up to heavy jars.
- Clear bins work best for canned goods so you see stock at a glance.
- Baskets hide loose items that look messy on display.
- Pick bins with handles for heavy loads to make pulling them down safe.
- Use a consistent style to make the whole space look finished and professional.
Measure, choose durable materials, and mix clear containers with baskets to create a functional, attractive setup. These simple storage ideas keep every item easy to find.
Maintaining Your New Organization System
A few minutes each week prevents clutter from creeping back into your shelves. This small habit saves you time and keeps the space useful for daily life.
I kept my pantry neat for six months by using a short routine after every grocery trip. I put items in their designated spots, wipe spills, and note anything low or expired.
Organizing is ongoing, so set aside one monthly check to scan dates and toss expired goods. If clutter returns, pause and tweak the system to match how your home actually uses the shelves.
- Spend 5–10 minutes weekly returning items to their spots.
- Do a quick monthly sweep for expiration dates and duplicates.
- Use clear labels so every family member follows the same way.
Consistency beats perfection. When everyone helps and routines stay simple, the pantry stays tidy and you save time and money at the store.
Adding Lighting to Dark Corners
Brightening shadowed shelves makes it easy to spot the jars and boxes you need fast. A battery-powered light can lift the gloom in a small pantry and cut down on wasted supplies.
Install stick-on LED strips under a shelf or a puck light on the wall. These options are plug-free and simple to set up, so you do not need an electrician for most installs.
Good light helps you read expiration dates on the top shelf and see items at the back of deep shelves. When everything is visible, the whole storage space feels more usable.
- Place motion-sensor lights near the door so the room lights on arrival.
- Add a small light in the back of deep shelves for full visibility.
- Keep spare batteries on hand to avoid dark moments during prep.
Many homeowners find lighting one of the easiest upgrades that makes a kitchen pantry feel high-end and far more functional.
Conclusion
Practical tweaks let you reclaim shelf space and save time every week.
Plan your shelf layout, pick storage that fits, and keep a short routine after shopping. Small habits make the system stick and keep your space useful for daily cooking.
Declutter regularly, rotate older items forward, and try different ways until the setup suits your family. These small steps cut waste and make meal prep faster.
Invest a little time now and you’ll enjoy a functional, low-stress pantry for years. Thanks for following the guide — may these tips stop food from hiding on your shelves.

I’m Daniel Carter, a designer based in Chicago with a passion for making small spaces work smarter. After years of living in cluttered apartments, I started experimenting with simple, low-cost organization systems that actually stuck. At Daily Dicas, I share what worked for me — practical tips for anyone who wants their home to feel calmer, more functional, and more intentional.