Anúncios
Adding custom shelves can transform a plain room into a thoughtful, organized space. Small wall projects let you display books, photos, and decor while freeing up floor area.
We’ve spent years installing wood and floating displays that blend storage with style. Some builds focused on heavy-duty storage, while others prioritized a light, modern look.
Anúncios
These projects work whether you need a spot for favorite books or a tidy place for everyday items. With careful material choices, you can craft pieces that match your taste and fit any budget.
In the next section, we’ll walk through simple plans and tools so you can pick the right approach for your room. Expect practical tips that make the process easy and rewarding.
Why DIY Shelf Ideas Bedroom Projects Are a Game Changer
Smart shelving turns tight corners into useful, attractive storage spots. In small rooms, this approach frees floor area and makes daily life easier.
Anúncios
We’ve added shelves to three of the four homes we’ve lived in over the past 15 years. Each diy project—from floating boards to built-ins—boosted function and gave us neat storage for books and keepsakes.
Following a clear tutorial helps beginners get professional results. A step-by-step guide cuts mistakes, speeds the build, and ensures safe, sturdy shelving.
- Adding custom shelves is a great way to reclaim lost floor space in a small room.
- Every diy project we finished improved how the home worked and felt.
- Well-placed shelves provide smart storage while lifting the visual style of the space.
- The best way add long-term value is to create storage that looks good and works hard, whether you’re reading at night or tidying a closet.
Essential Tools and Safety Tips for Your Shelving Project
Good preparation with the right tools keeps your wall-mounted storage secure and lasting. Before you start any diy project, gather a stud finder, level, drill, and quality fasteners. These basics cut mistakes and speed the work.
Finding Wall Studs
Use a reliable stud finder to locate framing behind drywall. Mark studs at the height you want the shelf and re-check across the wall. Anchoring into studs gives the strongest support for heavy loads.
Using Heavy Duty Anchors
If a stud isn’t available, choose heavy-duty anchors or toggle bolts rated for the weight you plan to carry. We suggest iron or metal anchors for long-term performance on plaster or drywall.
- Always use at least two screws per bracket to reduce sagging.
- Follow a clear installation tutorial and level each step to keep shelves true.
- Pick sturdy metal brackets that match the load and style of your shelving.
Taking these safe steps makes any shelf installation reliable. With the right hardware and a calm, step-by-step approach, your wall mounts will hold books and decor without worry.
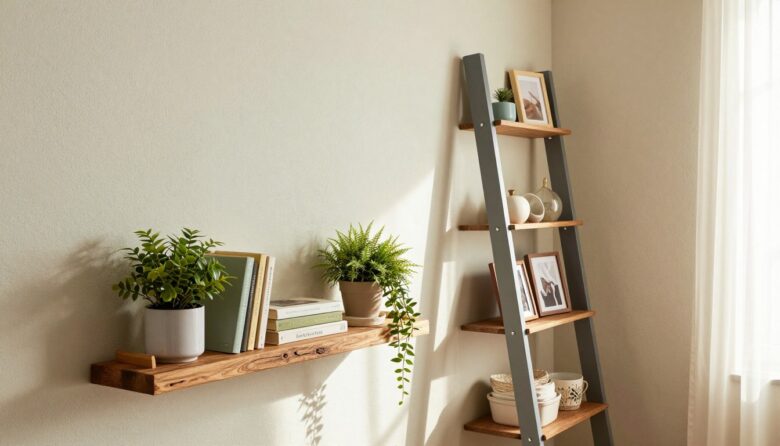
Floating Shelves for a Modern and Clean Look
A clean set of floating boards creates an airy, modern backdrop for books and decor. Floating shelves add display space while keeping the wall uncluttered.
Custom Wood Floating Shelves
Building wood floating pieces lets you match grain and finish to the room. A thick board gives a sturdy feel and works well for books and heavier items.
We built custom wood floating units in several rooms and used Pottery Barn wood floating boards in the kitchen for stronger display capacity.
Installing Store Bought Options
Store-bought floating shelf kits are fast and budget-friendly. The IKEA Lack series fit cleanly on narrow walls and were part of three of our four home installs.
Follow the included tutorial, find studs, and level each board to ensure a neat, stable installation that will hold dishes or reading material.
Disguising Brackets for a Floating Look
Hidden hardware creates the true floating effect. Metal brackets that cradle the board add strength while remaining out of sight for a sleek look.
- Choose a wood thickness that matches load needs and style.
- Use a clear tutorial to set anchor points and brackets accurately.
- Mix store-bought and custom units to balance budget and finish across the home.
Heavy Duty Storage Solutions for Maximum Space
When storage needs grow, heavy-duty shelving gives you reliable space without fuss.
For garage and attic loads, we build frames from 2x4s and plywood. This method repeats well across sheds and garages and holds heavy boxes and tools with confidence.
In the kitchen, we created pantry shelving around the refrigerator using MDF and 1×2 pine boards. Painting the units Edgecomb Gray helped the built-ins blend with the room and look intentional.
For small closets, the Rubbermaid closet system with metal tracks is a fast way to add adjustable storage. It converts a spare coat closet into usable space for toys, linens, or pantry overflow.
- Use 2×4 framing and plywood for the strongest shelving that carries weight.
- Match MDF boards and 1×2 pine trim to your kitchen color for a custom look.
- Install tracks and brackets for adjustable, flexible storage in tight spaces.
- Always square and level the frame—this step keeps shelving stable under load.
Creative Decorative Shelving to Elevate Your Style
Layering open shelving with art, plants, and books gives any living area instant character and function. Decorative units add architectural detail while keeping things useful. Use a mix of materials to balance texture and color on a wall.
Adding Plants and Books
Bring life to boards with low-light plants and a few favorite reads. Place a trailing plant beside a stack of books to soften lines and add height. Small pots work well on floating shelves and inside a built-in bookcase around a doorway.
- Pair reclaimed wood with polished nickel brackets for a refined kitchen display.
- Use Fjalkinge metal units where you need flexible storage that moves room to room.
- Mix closed cabinets and open shelving to hide clutter while showing decor pieces.
- Try a simple tutorial for diy wood shelving if you want a custom look with metal brackets.
Utilizing Nooks and Small Spaces for Extra Storage
Turn awkward slivers of wall into smart, usable storage with compact shelving solutions. A slim floating shelf in a corner can store a lamp, a book, or a small plant. It frees floor space and keeps the room neat.
We built a built-in bookcase at the foot of our son’s bed to use a tiny strip of floor. The base hides a pop-out storage nook for toys and seasonal items. That hidden spot makes the unit both tidy and functional.
A simple wood board in a bathroom window is another quick project. It brightens the space and gives a place for plants and reading material without taking room from daily traffic.
- Use adjustable shelving to fill narrow gaps, like the space between a washer and dryer.
- Even one well-placed shelf can tame a cramped utility closet and improve daily routines.
- Choose metal brackets or a clean floating option for a streamlined look that matches your home style.
How to Style Your Shelves Like a Pro
A well-styled set of shelves can turn everyday objects into a cohesive room story. Start by choosing a focal piece, then arrange around it with items of varied height and texture.
Mix books with plants and small decor to warm the display. Place taller objects at the ends and stack a few books horizontally to add layers. Leave breathing room so each item reads clearly.
Watch a quick timelapse tutorial to see placement move from chaotic to curated. Seeing the step-by-step process helps you copy proportions and spacing for your own wall project.
- Balance three types of items: books, a plant, and one art or decorative object.
- Use a single wood accent or color to tie the display back to the room.
- On kitchen or reading nooks, keep functional items grouped and decorative pieces separate.
- Keep negative space intentional—every display needs pauses to look finished.
Every placement should reflect your style and tell a small story about your home. Small edits often make the biggest visual impact.
Conclusion
Thoughtful shelving blends function with decor to lift the whole room. Simple builds and larger projects both add useful storage and clear visual charm.
From floating wood boards to built-in bookcases, there are solutions for every skill level and budget. Pick materials and hardware that match your routine and desired look.
Focus on balance: practical storage should support the room’s style while staying sturdy and safe. Use the installation and styling tips above to guide each step.
We hope this guide inspires you to start a project that adds storage and personality to your home. Enjoy the process and the finished results.
.

I’m Daniel Carter, a designer based in Chicago with a passion for making small spaces work smarter. After years of living in cluttered apartments, I started experimenting with simple, low-cost organization systems that actually stuck. At Daily Dicas, I share what worked for me — practical tips for anyone who wants their home to feel calmer, more functional, and more intentional.